cancel
Showing results for 
Search instead for 
Did you mean: 

Join the discussion

Most Recent
trice602
Super User
Super User

If you have worked in the Power Automate space long enough, you have probably come across the request "can you turn this webpage into a pdf?"  In this quick step-by-step walkthrough, I will show you how to do this fast!

Read more...

Deenuji
Resident Rockstar
Resident Rockstar

Power Fx is a versatile language known for its simplicity and effectiveness in handling various data operations, including dates. In this blog post, we'll explore how to perform common date-related tasks using Power Fx Formulas in power automate desktop.

Read more...

trice602
Super User
Super User

This is a common question I have answered more than once here and it is time to revisit my accepted solution from August of 2023.  In this example, I will show you how you can reference a saved image you want to include as an embedded/inline image and include in a Send an email (V2) action from either OneDrive or SharePoint - the formats are slightly different.  Goes without saying, make sure the permissions on your image allow others to view (if applicable).


Read more...

VJR
Multi Super User
Multi Super User

📢𝗣𝗼𝘄𝗲𝗿 𝗙𝘅 𝗶𝗻 𝗣𝗼𝘄𝗲𝗿 𝗔𝘂𝘁𝗼𝗺𝗮𝘁𝗲 𝗗𝗲𝘀𝗸𝘁𝗼𝗽 now supports 𝗶𝗻𝘁𝗲𝗿𝗽𝗼𝗹𝗮𝘁𝗲𝗱 𝘀𝘁𝗿𝗶𝗻𝗴𝘀

𝗪𝗵𝗮𝘁 𝗶𝘀 𝗦𝘁𝗿𝗶𝗻𝗴 𝗜𝗻𝘁𝗲𝗿𝗽𝗼𝗹𝗮𝘁𝗶𝗼𝗻?
It is a powerful feature which allows you to inject variables, expressions directly into a standard string. It makes creating and formatting strings easier and more readable.
Used in programming languages. Also available in Power Apps and now in Power Automate Desktop.

𝗘𝘅𝗮𝗺𝗽𝗹𝗲:
🔷 Power Fx in PAD – 𝗪𝗶𝘁𝗵𝗼𝘂𝘁 String Interpolation
="Welcome, " & vFirstName & " " & vLastName & ", " & "this is a nice update in PAD Version 2.41"

🔷 Power Fx in PAD – 𝗪𝗶𝘁𝗵 String Interpolation
=$"Welcome, {vFirstName} {vLastName}, this is a nice update in PAD Version 2.41"


Key points to note and benefits:
🔹String interpolation strings begin with a $
🔹Use curly braces {} to evaluate and embed the variable or expression
🔹Both, normal text or interpolated strings can be used anywhere within that line of text
🔹No need of any ‘&’ operator, thus easy to read as well as write formatted strings.
🔹This is applicable only for Power Fx enabled desktop flows (in preview). The "=" sign in the beginning is the Power Fx notation.

Below screenshot shows an output in 𝗣𝗔𝗗 using Power Fx – 𝗪𝗶𝘁𝗵 String Interpolation

Check out my post for a sample on how Power Fx in PAD can be used.
https://lnkd.in/dd4cMTcH


This feature is released in the February update Version 2.41

https://lnkd.in/dcFCtD5N

VJR
Multi Super User
Multi Super User

Problem Statement:

Power Automate Desktop currently does not have an option to set categories to Outlook emails.


These are what categories in Outlook are. They can be default ones like Blue Category, Orange Category, or you can customize your own ones as shown below.


VJR_0-1708414321517.png


Power Automate Desktop Solution:


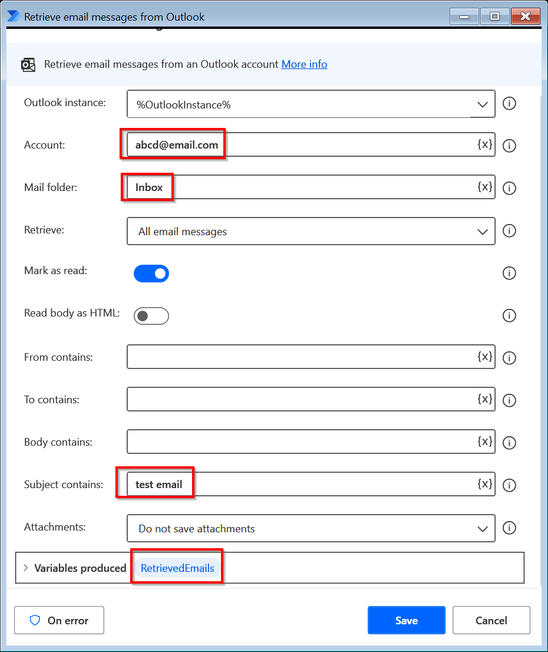
1. Launch Outlook and Configure the desired parameters for retrieving emails as per your specific criteria.

Here the email with the subject as "test email" in Inbox folder is configured.


VJR_1-1708414478100.png


2.  For the sake of this example only 1 email with the subject "test email" will be retrieved.

Hence, we are storing the unique EntryID of that email in a variable.


VJR_2-1708414539921.png


3. Here we are setting a variable with the desired Outlook categories

- Can pass single or as shown we are passing two categories at once.

IMP: Make sure that you have the correct spelling of the category name as per the list of already configured categories in the outlook application. First screenshot of this write-up.


VJR_3-1708414633208.png


4.  Here we are simply passing the above two variables to a Vbscript which will do the rest ie; setting the category to the email having the specified EntryID.


VJR_4-1708414738826.png


VBScript Code:


Option Explicit

' Create Outlook Application object
Dim objOutlook
Set objOutlook = CreateObject("Outlook.Application")

' Get the message by its ID
Dim objNamespace, objMessage
Set objNamespace = objOutlook.GetNamespace("MAPI")
Set objMessage = objNamespace.GetItemFromID("%EntryID%")

' Check if the message is found
If Not objMessage Is Nothing Then
    ' Set the category
    objMessage.Categories = "%CategoriesToSet%"
    objMessage.Save ' Save changes
    
   ' MsgBox "Category set successfully."
Else
    'MsgBox "Message not found."
End If

' Clean up
Set objMessage = Nothing
Set objNamespace = Nothing
Set objOutlook = Nothing


5. The overall PAD flow would look as below.


*I have also attached the txt file of the entire flow which you need to copy-paste inside a blank Flow editor.

The flow is built in PAD version 2.41


VJR_5-1708414920525.png

6. Thats it. The email output after running the above PAD flow is as follows.


VJR_7-1708414990467.png


7. Attached .txt file of the flow to copy-paste into a blank PAD editor.

When you copy paste the code chances are that Power Automate Desktop adds some slash characters especially in the vbscript and you may see some errors. Single back slashes may become double back slashes. To fix, take the vbscript code snippet posted above and paste it directly into the "Run vbscript" action. 


Monika001
Helper I
Helper I

User story: 

Create an access team whenever a new row is added to the Accounts table. Add the creator of the new row and their manager to the access team. Automate this process using power automate flow. 

What is an access team?

Access teams are a type of team that can be created in the Microsoft power platform to enable an extra level of security to your application. Access teams empower us to have a record level of security for our dataverse tables. Now, you might be wondering, when we already have some ways to achieve security in dataverse why use access teams?

Consider a scenario where an Azure Active Directory group has already been established for the purpose of restricting user access to a particular application. However, you do not want everyone in that AAD group to access all the records of that application. That is, you want some people to access only some records based on the ownership of the records. This is where the access group can help. With the help of power automate flows, you can automate to create access teams dynamically.

Read more...

trice602
Super User
Super User

This is an FAQ and I wanted to share the flow so others can find it quickly and make it your own!  In this short walkthrough, we will email Microsoft Form attachments from a single question that allows more than one file upload and email them to someone.  At the end of the walkthrough, you will have the knowledge to do this yourself and most importantly, you will learn about the framework and actions you can use in other flows.  #neverstoplearning #sharingiscaring

Read more...

Bennykil
Regular Visitor

I found this while working with a colleague and was faced with a sticky situation at work. I have this table in my database. However, I would like to send the data from the period date a day late. For example, I would like an email reporting Monday data on a Tuesday morning. So Friday reports Thursday data.


Now, here’s the problem. I would like to report Friday data, not Sunday data on Monday. 


How did we solve it? Let's find out

Read more...

ThisIsAShame
Regular Visitor

This is an article that outlines how to use Dataverse to reassign an approval on the behalf of someone else. Lots of posts say that you can’t reassign an approval without manually making the user click “Reassign”, but I outline a flow below that lets you reassign any existing approval as long as you have Dataverse access and 1 Premium license. This means that you don’t have to edit your existing flows, or add any workarounds to your processes. This will simply replicate the “Reassign” button users have, but let’s you press it for them.

Read more...

ManishSolanki
Super User
Super User

A simple use case explaining transforming data in SP list to Timesheet view!

Read more...

VJR
Multi Super User
Multi Super User

𝗨𝘀𝗲 𝗖𝗮𝘀𝗲 𝟱: 𝗣𝗼𝘄𝗲𝗿 𝗔𝘂𝘁𝗼𝗺𝗮𝘁𝗲 𝗗𝗲𝘀𝗸𝘁𝗼𝗽 + 𝗚𝗣𝗧

𝗧𝗶𝘁𝗹𝗲: Auto-reply based on type of incoming request


🔹Use it with the "Create text with GPT" action of Power Automate Desktop

Or

🔹Call GPT OpenAI API from Power Automate Desktop

https://powerusers.microsoft.com/t5/Power-Automate-Cookbook/Integrating-ChatGPT-with-Power-Automate-...


🔷 GPT prompt suffix to be added by RPA to the original text is:
[𝘞𝘳𝘪𝘵𝘦 𝘢𝘯 𝘢𝘶𝘵𝘰-𝘳𝘦𝘱𝘭𝘺 𝘧𝘰𝘳 𝘵𝘩𝘦 𝘢𝘣𝘰𝘷𝘦 𝘵𝘦𝘹𝘵]

🔷 Human can validate the auto-reply suggested by ChatGPT, make necessary modifications like add URLs, attach Receipts, catalogues, ticket number, etc. and reply back to the sender.

🔷 Customise the ChatGPT AI model for specific replies and keywords as per your business

🔷 Use it for an incoming email or wherever relevant during RPA automation.


Screenshots of Live outputs after calling the API from Power Automate Desktop.


VJR_0-1702549361682.png


VJR_1-1702549385327.png


VJR_2-1702549408278.png


VJR
Multi Super User
Multi Super User

𝗨𝘀𝗲 𝗖𝗮𝘀𝗲 𝟰: 𝗣𝗼𝘄𝗲𝗿 𝗔𝘂𝘁𝗼𝗺𝗮𝘁𝗲 𝗗𝗲𝘀𝗸𝘁𝗼𝗽 + 𝗚𝗣𝗧

𝗧𝗶𝘁𝗹𝗲: Language Translation services using GPT


🔹Use it with the "Create text with GPT" action of Power Automate Desktop

Or

🔹Call GPT OpenAI API from Power Automate Desktop

https://powerusers.microsoft.com/t5/Power-Automate-Cookbook/Integrating-ChatGPT-with-Power-Automate-...


RPA and ChatGPT can work together using language translation in various ways, such as:

1️⃣ 𝗗𝗮𝘁𝗮 𝗰𝗼𝗹𝗹𝗲𝗰𝘁𝗶𝗼𝗻 𝗮𝗻𝗱 𝗮𝗻𝗮𝗹𝘆𝘀𝗶𝘀: RPA can collect data from various sources, such as websites, emails, desktop applications, PDFs, databases, in multiple languages, and ChatGPT can process and analyze the data to provide insights and recommendations.

2️⃣ 𝗟𝗮𝗻𝗴𝘂𝗮𝗴𝗲 𝗜𝗱𝗲𝗻𝘁𝗶𝗳𝗶𝗰𝗮𝘁𝗶𝗼𝗻 & 𝗧𝗿𝗮𝗻𝘀𝗹𝗮𝘁𝗶𝗼𝗻: RPA can identify the language of text data and ChatGPT can translate the text into a common language for communication and collaboration.

3️⃣ 𝗧𝗿𝗮𝗻𝘀𝗹𝗮𝘁𝗶𝗼𝗻 𝗶𝗺𝗽𝗿𝗼𝘃𝗲𝗺𝗲𝗻𝘁𝘀: RPA and ChatGPT can provide feedback and suggestions for improving the quality and accuracy of the translation.

4️⃣ 𝗟𝗮𝗻𝗴𝘂𝗮𝗴𝗲 𝗹𝗼𝗰𝗮𝗹𝗶𝘇𝗮𝘁𝗶𝗼𝗻: RPA can help localize content, such as websites, marketing materials, by translating the content into multiple languages, and ChatGPT can provide recommendations for adapting the content to the local culture and context.

5️⃣ 𝗟𝗮𝗻𝗴𝘂𝗮𝗴𝗲 𝘁𝗿𝗮𝗶𝗻𝗶𝗻𝗴: ChatGPT can help train language models and RPA can automate the process of data collection and preparation to improve the efficiency and effectiveness of the training.

...and more.

Overall, RPA and ChatGPT can complement each other in various aspects of 𝗹𝗮𝗻𝗴𝘂𝗮𝗴𝗲 𝘁𝗿𝗮𝗻𝘀𝗹𝗮𝘁𝗶𝗼𝗻 and across 𝘃𝗮𝗿𝗶𝗼𝘂𝘀 𝗱𝗼𝗺𝗮𝗶𝗻𝘀.

🔷 Below screenshots are ChatGPT’s response via API call from Power Automate Desktop.

Just like the other use cases I have shared earlier, a 𝗸𝗲𝘆 𝘁𝗶𝗽 here is to suffix the below text to the original text while calling the API

[“Please translate the above to <Name_Of_Supported_Language>”]

Refer highlighted in screenshots.

🔷 Can be used to translate from any of the 109 supported languages to any other


VJR_0-1702549101586.png


VJR_1-1702549122180.png


VJR
Multi Super User
Multi Super User

𝗨𝘀𝗲 𝗖𝗮𝘀𝗲 𝟮: 𝗣𝗼𝘄𝗲𝗿 𝗔𝘂𝘁𝗼𝗺𝗮𝘁𝗲 𝗗𝗲𝘀𝗸𝘁𝗼𝗽 + 𝗚𝗣𝗧

𝗧𝗶𝘁𝗹𝗲: Extract key value pairs from unstructured data


🔹Use it with the "Create text with GPT" action of Power Automate Desktop

Or

🔹Call GPT OpenAI API from Power Automate Desktop

https://powerusers.microsoft.com/t5/Power-Automate-Cookbook/Integrating-ChatGPT-with-Power-Automate-...


𝙒𝙤𝙧𝙠𝙛𝙡𝙤𝙬 𝙤𝙛 𝙍𝙋𝘼 𝙗𝙤𝙩:

𝗘𝘅𝗮𝗺𝗽𝗹𝗲 𝟭: 𝗜𝗧 𝗦𝘂𝗽𝗽𝗼𝗿𝘁

𝟭. 𝗥𝗣𝗔 𝗯𝗼𝘁: Power Automate Desktop (PAD) reads the above sources using API or via UI interaction or OCR.

𝟮. 𝗦𝗼𝘂𝗿𝗰𝗲 𝗰𝗼𝗻𝘁𝗮𝗶𝗻𝘀 𝗯𝗲𝗹𝗼𝘄 𝘁𝗲𝘅𝘁:
𝘋𝘦𝘢𝘳 𝘚𝘶𝘱𝘱𝘰𝘳𝘵,
𝘐 𝘢𝘮 𝘩𝘢𝘷𝘪𝘯𝘨 𝘢𝘯 𝘪𝘴𝘴𝘶𝘦 𝘸𝘪𝘵𝘩 𝘮𝘺 𝘤𝘰𝘮𝘱𝘶𝘵𝘦𝘳. 𝘛𝘩𝘦 𝘴𝘤𝘳𝘦𝘦𝘯 𝘬𝘦𝘦𝘱𝘴 𝘧𝘳𝘦𝘦𝘻𝘪𝘯𝘨 𝘢𝘯𝘥 𝘐 𝘤𝘢𝘯'𝘵 𝘴𝘦𝘦𝘮 𝘵𝘰 𝘧𝘪𝘯𝘥 𝘢 𝘴𝘰𝘭𝘶𝘵𝘪𝘰𝘯. 𝘐 𝘩𝘢𝘷𝘦 𝘵𝘳𝘪𝘦𝘥 𝘳𝘦𝘴𝘵𝘢𝘳𝘵𝘪𝘯𝘨 𝘵𝘩𝘦 𝘤𝘰𝘮𝘱𝘶𝘵𝘦𝘳 𝘴𝘦𝘷𝘦𝘳𝘢𝘭 𝘵𝘪𝘮𝘦𝘴 𝘣𝘶𝘵 𝘵𝘩𝘦 𝘱𝘳𝘰𝘣𝘭𝘦𝘮 𝘱𝘦𝘳𝘴𝘪𝘴𝘵𝘴. 𝘔𝘺 𝘤𝘰𝘮𝘱𝘶𝘵𝘦𝘳 𝘮𝘰𝘥𝘦𝘭 𝘪𝘴 𝘋𝘦𝘭𝘭 𝘐𝘯𝘴𝘱𝘪𝘳𝘰𝘯 15 𝘢𝘯𝘥 𝘵𝘩𝘦 𝘰𝘱𝘦𝘳𝘢𝘵𝘪𝘯𝘨 𝘴𝘺𝘴𝘵𝘦𝘮 𝘪𝘴 𝘞𝘪𝘯𝘥𝘰𝘸𝘴 10. 𝘗𝘭𝘦𝘢𝘴𝘦 𝘩𝘦𝘭𝘱 𝘮𝘦 𝘳𝘦𝘴𝘰𝘭𝘷𝘦 𝘵𝘩𝘪𝘴 𝘪𝘴𝘴𝘶𝘦 𝘢𝘴 𝘴𝘰𝘰𝘯 𝘢𝘴 𝘱𝘰𝘴𝘴𝘪𝘣𝘭𝘦.
𝘛𝘩𝘢𝘯𝘬 𝘺𝘰𝘶.
𝘝𝘪𝘫𝘢𝘺

𝟯. 𝗥𝗣𝗔 𝗯𝗼𝘁:
Sends the above text to ChatGPT suffixed as:
[Can you extract the key value pairs of the above text in Json format]

𝟰. 𝗥𝗲𝘀𝗽𝗼𝗻𝘀𝗲 𝗳𝗿𝗼𝗺 𝗖𝗵𝗮𝘁𝗚𝗣𝗧:
The corresponding key value pair of the above text in JSON.

𝟱. 𝗥𝗣𝗔 𝗯𝗼𝘁:
🔹"Convert JSON to Custom Object" - This is an action in Power Automate Desktop.
🔹RPA bot creates a ticket based on the key value pairs using API or UI interaction.

𝟲. 𝗙𝗶𝗻𝗮𝗹 𝗢𝘂𝘁𝗽𝘂𝘁 𝗮𝘀 𝗸𝗲𝘆 𝘃𝗮𝗹𝘂𝗲 𝗽𝗮𝗶𝗿𝘀:

VJR_0-1702548766962.png


𝗘𝘅𝗮𝗺𝗽𝗹𝗲 𝟮: 𝗥𝗲𝗰𝗲𝗶𝗽𝘁 𝗽𝗿𝗼𝗰𝗲𝘀𝘀𝗶𝗻𝗴
𝗜𝗻𝗽𝘂𝘁 𝘀𝗲𝗻𝘁 𝗯𝘆 𝗥𝗣𝗔:
"ABC Supermarket
1234 Main Street
Anytown, USA 12345

Date: 01/20/2023
Time: 11:45 AM
Receipt No.: 123456789

Item Quantity Price
Product A 1 $10.00
Product B 2 $5.00 each
Product C 3 $3.00 each

Subtotal: $32.00
Tax: $2.56
Total: $34.56

Payment Method: Visa
Card Number: **** **** **** 1234
Authorization Code: 123456

Thank you for shopping at ABC Supermarket!

Visit us again soon."
[Can you extract the key value pairs of the above text in Json format]

𝗙𝗶𝗻𝗮𝗹 𝗢𝘂𝘁𝗽𝘂𝘁 𝗮𝘀 𝗸𝗲𝘆 𝘃𝗮𝗹𝘂𝗲 𝗽𝗮𝗶𝗿𝘀:

VJR_1-1702548804196.png


𝗘𝘅𝗮𝗺𝗽𝗹𝗲 𝟯: 𝗦𝗮𝗹𝗲𝘀/𝗢𝗿𝗱𝗲𝗿 𝗣𝗿𝗼𝗰𝗲𝘀𝘀𝗶𝗻𝗴
𝗜𝗻𝗽𝘂𝘁 𝘀𝗲𝗻𝘁 𝗯𝘆 𝗥𝗣𝗔:
𝘋𝘦𝘢𝘳 𝘚𝘢𝘭𝘦𝘴,
𝘐 𝘸𝘰𝘶𝘭𝘥 𝘭𝘪𝘬𝘦 𝘵𝘰 𝘱𝘭𝘢𝘤𝘦 𝘢𝘯 𝘰𝘳𝘥𝘦𝘳 𝘧𝘰𝘳 𝘵𝘩𝘦 𝘧𝘰𝘭𝘭𝘰𝘸𝘪𝘯𝘨 𝘪𝘵𝘦𝘮𝘴: 10 𝘶𝘯𝘪𝘵𝘴 𝘰𝘧 𝘗𝘳𝘰𝘥𝘶𝘤𝘵 𝘈 (𝘚𝘒𝘜: 𝘈123) 5 𝘶𝘯𝘪𝘵𝘴 𝘰𝘧 𝘗𝘳𝘰𝘥𝘶𝘤𝘵 𝘉 (𝘚𝘒𝘜: 𝘉456) 20 𝘶𝘯𝘪𝘵𝘴 𝘰𝘧 𝘗𝘳𝘰𝘥𝘶𝘤𝘵 𝘊 (𝘚𝘒𝘜: 𝘊789) 𝘗𝘭𝘦𝘢𝘴𝘦 𝘭𝘦𝘵 𝘮𝘦 𝘬𝘯𝘰𝘸 𝘵𝘩𝘦 𝘵𝘰𝘵𝘢𝘭 𝘤𝘰𝘴𝘵 𝘰𝘧 𝘵𝘩𝘦 𝘰𝘳𝘥𝘦𝘳 𝘢𝘯𝘥 𝘵𝘩𝘦 𝘦𝘴𝘵𝘪𝘮𝘢𝘵𝘦𝘥 𝘥𝘦𝘭𝘪𝘷𝘦𝘳𝘺 𝘵𝘪𝘮𝘦.
𝘝𝘪𝘫𝘢𝘺
[Can you extract the key value pairs of the above text in Json format]

𝗙𝗶𝗻𝗮𝗹 𝗢𝘂𝘁𝗽𝘂𝘁:

VJR_2-1702548830240.png


VJR
Multi Super User
Multi Super User

𝗨𝘀𝗲 𝗖𝗮𝘀𝗲 𝟯: 𝗣𝗼𝘄𝗲𝗿 𝗔𝘂𝘁𝗼𝗺𝗮𝘁𝗲 𝗗𝗲𝘀𝗸𝘁𝗼𝗽 + 𝗚𝗣𝗧

𝗧𝗶𝘁𝗹𝗲: Find out the category / department name / routing area of service and expedite input queries.


🔹Use it with the "Create text with GPT" action of Power Automate Desktop

Or

🔹Call GPT OpenAI API from Power Automate Desktop

https://powerusers.microsoft.com/t5/Power-Automate-Cookbook/Integrating-ChatGPT-with-Power-Automate-...


𝗦𝗼𝘂𝗿𝗰𝗲: Incoming email body / Ticket description / Any field on any application that is readable by RPA

𝙒𝙤𝙧𝙠𝙛𝙡𝙤𝙬 𝙤𝙛 𝙍𝙋𝘼 𝙗𝙤𝙩:

𝗘𝘅𝗮𝗺𝗽𝗹𝗲:

𝟭. 𝗥𝗣𝗔 𝗯𝗼𝘁: Power Automate Desktop (PAD) reads the above sources using API or via UI interaction

𝟮. 𝗦𝗼𝘂𝗿𝗰𝗲 𝗰𝗼𝗻𝘁𝗮𝗶𝗻𝘀 𝗯𝗲𝗹𝗼𝘄 𝘁𝗲𝘅𝘁:
"𝘏𝘦𝘭𝘭𝘰, 𝘐 𝘩𝘢𝘷𝘦 𝘳𝘦𝘤𝘦𝘯𝘵𝘭𝘺 𝘳𝘦𝘤𝘦𝘪𝘷𝘦𝘥 𝘮𝘺 𝘮𝘰𝘯𝘵𝘩𝘭𝘺 𝘪𝘯𝘷𝘰𝘪𝘤𝘦 𝘢𝘯𝘥 𝘯𝘰𝘵𝘪𝘤𝘦𝘥 𝘵𝘩𝘢𝘵 𝘵𝘩𝘦 𝘢𝘮𝘰𝘶𝘯𝘵 𝘤𝘩𝘢𝘳𝘨𝘦𝘥 𝘪𝘴 𝘪𝘯𝘤𝘰𝘳𝘳𝘦𝘤𝘵. 𝘐 𝘩𝘢𝘷𝘦 𝘤𝘩𝘦𝘤𝘬𝘦𝘥 𝘮𝘺 𝘶𝘴𝘢𝘨𝘦 𝘢𝘯𝘥 𝘪𝘵 𝘴𝘦𝘦𝘮𝘴 𝘵𝘩𝘢𝘵 𝘐 𝘩𝘢𝘷𝘦 𝘣𝘦𝘦𝘯 𝘤𝘩𝘢𝘳𝘨𝘦𝘥 𝘧𝘰𝘳 𝘴𝘦𝘳𝘷𝘪𝘤𝘦𝘴 𝘵𝘩𝘢𝘵 𝘐 𝘩𝘢𝘷𝘦 𝘯𝘰𝘵 𝘶𝘴𝘦𝘥. 𝘊𝘰𝘶𝘭𝘥 𝘺𝘰𝘶 𝘱𝘭𝘦𝘢𝘴𝘦 𝘵𝘢𝘬𝘦 𝘢 𝘭𝘰𝘰𝘬 𝘢𝘵 𝘮𝘺 𝘢𝘤𝘤𝘰𝘶𝘯𝘵 𝘢𝘯𝘥 𝘳𝘦𝘴𝘰𝘭𝘷𝘦 𝘵𝘩𝘪𝘴 𝘪𝘴𝘴𝘶𝘦? 𝘐 𝘸𝘰𝘶𝘭𝘥 𝘢𝘭𝘴𝘰 𝘭𝘪𝘬𝘦 𝘵𝘰 𝘳𝘦𝘤𝘦𝘪𝘷𝘦 𝘢𝘯 𝘶𝘱𝘥𝘢𝘵𝘦𝘥 𝘪𝘯𝘷𝘰𝘪𝘤𝘦 𝘳𝘦𝘧𝘭𝘦𝘤𝘵𝘪𝘯𝘨 𝘵𝘩𝘦 𝘤𝘰𝘳𝘳𝘦𝘤𝘵 𝘤𝘩𝘢𝘳𝘨𝘦𝘴. 𝘛𝘩𝘢𝘯𝘬 𝘺𝘰𝘶 𝘧𝘰𝘳 𝘺𝘰𝘶𝘳 𝘢𝘴𝘴𝘪𝘴𝘵𝘢𝘯𝘤𝘦."

𝟯. 𝗥𝗣𝗔 𝗯𝗼��:
Sends the above text to ChatGPT suffixed as:
[Give the department name for the above in short]

𝟰. 𝗥𝗲𝘀𝗽𝗼𝗻𝘀𝗲 𝗳𝗿𝗼𝗺 𝗖𝗵𝗮𝘁𝗚𝗣𝗧:
Billing Department (attached screenshot)

𝟱. 𝗥𝗣𝗔 𝗕𝗼𝘁:
Can create a ticket in the ticketing system for the appropriate department
𝗼𝗿 forward the email to the email Id of the respective department
𝗼𝗿 a human can validate this and take the appropriate action
𝗼𝗿 all of the above.


𝗔 𝗸𝗲𝘆 𝗽𝗼𝗶𝗻𝘁:
It is vital to know how to send the text to ChatGPT.
In the suffix text for the above example, it is important to mention the keywords as "in short" else ChatGPT responds with a long text.
[Give the department name for the above 𝗶𝗻 𝘀𝗵𝗼𝗿𝘁]
Notice the same in the other screenshots attached.

🔹Attached are some examples that I sent to the API through Power Automate Desktop
🔹You can also mention "category name" in place of department.
[Give the department / 𝗰𝗮𝘁𝗲𝗴𝗼𝗿𝘆 𝗻𝗮𝗺𝗲 for the above in short]
One Example attached.


VJR_1-1702548059156.png


VJR_2-1702548080985.png


VJR_3-1702548101389.png


VJR_4-1702548129026.png


VJR_5-1702548150902.png


VJR
Multi Super User
Multi Super User

𝐔𝐬𝐞𝐂𝐚𝐬𝐞 𝟏: 𝐏𝐨𝐰𝐞𝐫 𝐀𝐮𝐭𝐨𝐦𝐚𝐭𝐞 𝐃𝐞𝐬𝐤𝐭𝐨𝐩 + 𝐆𝐏𝐓

𝗧𝗶𝘁𝗹𝗲: 𝖤𝗆𝗈𝗍𝗂𝗈𝗇 𝖺𝗇𝖽 𝖲𝖾𝗇𝗍𝗂𝗆𝖾𝗇𝗍 𝖠𝗇𝖺𝗅𝗒𝗌𝗂𝗌 𝗎𝗌𝗂𝗇𝗀 𝖦𝖯𝖳


VJR_1-1702547513591.png


🔹Use it with the "Create text with GPT" action of Power Automate Desktop

Or

🔹Call GPT OpenAI API from Power Automate Desktop

https://powerusers.microsoft.com/t5/Power-Automate-Cookbook/Integrating-ChatGPT-with-Power-Automate-...


𝗪𝗼𝗿𝗸𝗳𝗹𝗼𝘄 𝗼𝗳 𝗥𝗣𝗔 𝗯𝗼𝘁: Example 1

𝟭. 𝗦𝗼𝘂𝗿𝗰𝗲: Incoming email body / Ticket description / Any field on any application readable by RPA

𝟮. 𝗥𝗣𝗔 𝗯𝗼𝘁: Power Automate Desktop (PAD) reads the above sources using API or via screen scraping.

𝟯. 𝗠𝗲𝗻𝘁𝗶𝗼𝗻𝗲𝗱 𝗯𝘆 𝗮 𝗵𝘂𝗺𝗮𝗻 𝗶𝗻 𝗮𝗻𝘆 𝗼𝗳 𝘁𝗵𝗲 𝗮𝗯𝗼𝘃𝗲 𝘀𝗼𝘂𝗿𝗰𝗲𝘀:
"𝘛𝘩𝘦 𝘱𝘳𝘰𝘥𝘶𝘤𝘵 𝘐 𝘳𝘦𝘤𝘦𝘪𝘷𝘦𝘥 𝘸𝘢𝘴 𝘥𝘦𝘧𝘦𝘤𝘵𝘪𝘷𝘦 𝘢𝘯𝘥 𝘵𝘩𝘦 𝘤𝘶𝘴𝘵𝘰𝘮𝘦𝘳 𝘴𝘦𝘳𝘷𝘪𝘤𝘦 𝘵𝘦𝘢𝘮 𝘸𝘢𝘴 𝘶𝘯𝘳𝘦𝘴𝘱𝘰𝘯𝘴𝘪𝘷𝘦 𝘢𝘯𝘥 𝘶𝘯𝘩𝘦𝘭𝘱𝘧𝘶𝘭 𝘸𝘩𝘦𝘯 𝘐 𝘳𝘦𝘢𝘤𝘩𝘦𝘥 𝘰𝘶𝘵 𝘧𝘰𝘳 𝘢𝘴𝘴𝘪𝘴𝘵𝘢𝘯𝘤𝘦. 𝘐 𝘢𝘮 𝘦𝘹𝘵𝘳𝘦𝘮𝘦𝘭𝘺 𝘥𝘪𝘴𝘴𝘢𝘵𝘪𝘴𝘧𝘪𝘦𝘥 𝘸𝘪𝘵𝘩 𝘮𝘺 𝘦𝘹𝘱𝘦𝘳𝘪𝘦��𝘤𝘦 𝘢𝘯𝘥 𝘸𝘪𝘭𝘭 𝘯𝘰𝘵 𝘣𝘦 𝘱𝘶𝘳𝘤𝘩𝘢𝘴𝘪𝘯𝘨 𝘧𝘳𝘰𝘮 𝘵𝘩𝘪𝘴 𝘤𝘰𝘮𝘱𝘢𝘯𝘺 𝘢𝘨𝘢𝘪𝘯."

𝟰. 𝗥𝗣𝗔 𝗯𝗼𝘁:
Sends the above text to ChatGPT with a question suffixed as:
[Can you give me the emotion and sentiment analysis of the above text each in one word?]

𝟱. 𝗥𝗲𝘀𝗽𝗼𝗻𝘀𝗲 𝗳𝗿𝗼𝗺 𝗖𝗵𝗮𝘁𝗚𝗣𝗧:
Emotion: Frustration
Sentiment: Negative

𝗛𝘂𝗺𝗮𝗻 𝘁𝗮𝗸𝗲𝘀 𝗽𝗼𝘀𝘀𝗶𝗯𝗹𝗲 𝗙𝗼𝗹𝗹𝗼𝘄-𝘂𝗽 𝗮𝗰𝘁𝗶𝗼𝗻𝘀:
🔹Give a call to the sender
🔹Elevate the customer service
🔹‘Up’ the priority of the ticket (𝗥𝗣𝗔 can do this)
🔹Expedite the resolution of the sender’s issue (𝗥𝗣𝗔 can assist on this)


𝗞𝗲𝘆 𝘁𝗶𝗽:
When you pass this from RPA to ChatGPT, it is 𝘃𝗶𝘁𝗮𝗹 to mention as “𝘦𝘢𝘤𝘩 𝘪𝘯 𝘰𝘯𝘦 𝘸𝘰𝘳𝘥”, else it returns a long answer.
[Can you give me the emotion and sentiment analysis of the above text 𝗲𝗮𝗰𝗵 𝗶𝗻 𝗼𝗻𝗲 𝘄𝗼𝗿𝗱?]


Example 2:
𝗜𝗻𝗽𝘂𝘁 𝘀𝗲𝗻𝘁 𝗯𝘆 𝗥𝗣𝗔:
"𝘐 𝘢𝘮 𝘦𝘹𝘵𝘳𝘦𝘮𝘦𝘭𝘺 𝘴𝘢𝘵𝘪𝘴𝘧𝘪𝘦𝘥 𝘸𝘪𝘵𝘩 𝘵𝘩𝘦 𝘴𝘦𝘳𝘷𝘪𝘤𝘦 𝘐 𝘳𝘦𝘤𝘦𝘪𝘷𝘦𝘥. 𝘛𝘩𝘦 𝘤𝘶𝘴𝘵𝘰𝘮𝘦𝘳 𝘴𝘦𝘳𝘷𝘪𝘤𝘦 𝘳𝘦𝘱𝘳𝘦𝘴𝘦𝘯𝘵𝘢𝘵𝘪��𝘦 𝘸𝘢𝘴 𝘷𝘦𝘳𝘺 𝘩𝘦𝘭𝘱𝘧𝘶𝘭 𝘢𝘯𝘥 𝘳𝘦𝘴𝘰𝘭𝘷𝘦𝘥 𝘮𝘺 𝘪𝘴𝘴𝘶𝘦 𝘦𝘧𝘧𝘪𝘤𝘪𝘦𝘯𝘵𝘭𝘺. 𝘐 𝘸𝘪𝘭𝘭 𝘥𝘦𝘧𝘪𝘯𝘪𝘵𝘦𝘭𝘺 𝘣𝘦 𝘳𝘦𝘵𝘶𝘳𝘯𝘪𝘯𝘨 𝘢𝘴 𝘢 𝘤𝘶𝘴𝘵𝘰𝘮𝘦𝘳."

𝗢𝘂𝘁𝗽𝘂𝘁 𝗳𝗿𝗼𝗺 𝗖𝗵𝗮𝘁𝗚𝗣𝗧:
Emotion: Pleased
Sentiment: Positive


Example 3:
𝗜𝗻𝗽𝘂𝘁 𝘀𝗲𝗻𝘁 𝗯𝘆 𝗥𝗣𝗔:
"𝘛𝘩𝘦 𝘱𝘳𝘰𝘥𝘶𝘤𝘵 𝘮𝘦𝘵 𝘮𝘺 𝘦𝘹𝘱𝘦𝘤𝘵𝘢𝘵𝘪𝘰𝘯𝘴 𝘢𝘯𝘥 𝘵𝘩𝘦 𝘤𝘶𝘴𝘵𝘰𝘮𝘦𝘳 𝘴𝘦𝘳𝘷𝘪𝘤𝘦 𝘵𝘦𝘢𝘮 𝘸𝘢𝘴 𝘳𝘦𝘴𝘱𝘰𝘯𝘴𝘪𝘷𝘦 𝘸𝘩𝘦𝘯 𝘐 𝘳𝘦𝘢𝘤𝘩𝘦𝘥 𝘰𝘶𝘵 𝘧𝘰𝘳 𝘢𝘴𝘴𝘪𝘴𝘵𝘢𝘯𝘤𝘦. 𝘐 𝘢𝘮 𝘺𝘦𝘵 𝘵𝘰 𝘥𝘦𝘵𝘦𝘳𝘮𝘪𝘯𝘦 𝘢𝘯𝘥 𝘯𝘰𝘵 𝘺𝘦𝘵 𝘴𝘶𝘳𝘦 𝘢𝘣𝘰𝘶𝘵 𝘮𝘺 𝘦𝘹𝘱𝘦𝘳𝘪𝘦𝘯𝘤𝘦"

𝗢𝘂𝘁𝗽𝘂𝘁 𝗳𝗿𝗼𝗺 𝗖𝗵𝗮𝘁𝗚𝗣𝗧:
Emotion: Indifferent
Sentiment: Neutral


Final Words:

🔹These are just examples but the real idea is to use it in any industry where you pass a text to evaluate the emotions and sentiments behind it and take the necessary course of action.

PowerAI
New Member

In preparing for the start of a new school year, I sought to improve the workflow efficiency of our current behavior management system. As a science teacher, I was not confident in the use of Power Automate in the beginning, but I later found it to be intuitive to use and very helpful.

Read more...

ManishSolanki
Super User
Super User

How to convert CSV file to array of JSON objects? This tutorial is best suited for large CSV file. Check out here!

Read more...

ManishSolanki
Super User
Super User

How to join arrays efficiently in Power Automate? Check this out!

Read more...

ManishSolanki
Super User
Super User

How to filter the records by single select choice column text in Dataverse? Check this out!

Read more...

Nived_Nambiar
Super User
Super User

Hi all,


Here I am sharing how easily we can update an array property values using another array. This approach would help to avoid long way of updating array which involves loops. Here we will see how we will do it with select action itself. Kindly go through this article to get full idea on how we will be doing this !

Read more...

ManishSolanki
Super User
Super User

What do you do when you want to extract data from html table in the email body? Check this out!

Read more...

ShanmugaRaja
Advocate II
Advocate II

Adaptive Cards play a crucial role within Power Virtual Agents, providing a versatile and interactive method for user engagement. They server to present diverse content, gather user inputs, and deliver dynamic interfaces that adapt according to user interactions. Through the utilization of the Ask with Adaptive Card feature, developers can craft chatbot experiences that are both more captivating and interactive, ultimately enhancing user contentment and elevating the overall effectiveness of the chatbot.

Read more...

adedapo
Helper V
Helper V

In today's fast-paced business world, automation is crucial for staying competitive. Microsoft Power Automate is a powerful tool that has revolutionized the automation industry. It enables users to create automated workflows between different applications and services. To create complex workflows, understanding Power Automate expressions is essential. These expressions allow users to manipulate data, make decisions, and perform actions effectively. Whether you're a beginner or an advanced user, this blog post will provide valuable insights into Power Automate expressions and help you automate your business processes efficiently.


Read more...

ShanmugaRaja
Advocate II
Advocate II

Integrating Dynamic 365 CRM with Third party API via custom connector using Power Automate – Part1


This article is the first part of the integrating Dynamic 365 CRM with Third party API via custom connector using Power Automate discussion series which focuses on giving you a comprehensive description about Creating Custom Connector for Third Party API using Power Automate.


As I need a Third-Party API to access, a bit of google Fu led me to find out this free APILayer, which is really handy to request the exchange rate against a specific currency by setting the base parameter in the request.


Working principle of the solution is:

Our primary goal is to capture live Exchange Rate from third party API and update the currencies records in the Dynamic CE on a daily basis. I have divided this real time use case in to two parts:

1. Creating Custom Connector to retrieve live Exchange Rates using Power Automate
2. Creating recurring flow to retrieve live Exchange Rates for provided currencies and send it for an approval. The approved exchange Rates are updated in Dynamic 365 CRM on confirmation from Business users.

Power platform is enabled developer to create custom connector in five easy steps.


Let’s Start!!


Step #1: Update General Details

General tab, do the following:

  • Upload a connector icon of your choosing (optional).
  • Updated icon background color of your choice.
  • In the Description field, enter a meaningful value. This description will help others decide whether the connector might be useful to them.
  • Update Host to the address for the Currency Exchange Rate API. The connector uses the API host and the base URL to determine how to call the API.


ShanmugaRaja_0-1675090413016.png


Step #2: Specify Authentication Type:

There are several options available for authentication in custom connectors. The Currency Exchange Rate APIs use API Key authentication.

  1. On the Security tab, under Authentication type, select API Key.


ShanmugaRaja_1-1675090603871.png


2. Under API Key, update a parameter label, name and location details.


ShanmugaRaja_2-1675090660086.png


ShanmugaRaja_0-1675315274405.png


Step#3: Create the connector definition

Custom connectors can have one or more actions. In this article on currency exchange rate connector will only have one action.

1. On the definition tab, select New action.


ShanmugaRaja_0-1675091463349.png


2. In General section, Add a summary, description and Operation ID for this action. The summary and description will be show in Power Automate to identify the action whereas Operation ID will be used in Power Apps. Operation ID must be a text string with no space.


ShanmugaRaja_1-1675091533662.png


ShanmugaRaja_1-1675315341133.png


3. In Request section display inform based on the HTTP request for the action. Select Import fromsample.


ShanmugaRaja_0-1675091925364.png


4. Specify the information necessary to connect to the API. The Verb list shows a standard set of API request types (GET, POST, DELETE, PUT, PATCH, HEAD, OPTIONS). In our case, selected the GET method and specify the request URL (https://api.apilayer.com/currency_data/live?source=source&currencies=currencies) And then select Import.


ShanmugaRaja_1-1675092037560.png


When we import the sample URL its query parameters appear in the Request section. We must setup each of the parameters.


ShanmugaRaja_2-1675092113493.png


ShanmugaRaja_0-1675315428648.png

Edit the request parameters


ShanmugaRaja_0-1675092482224.png


In our case, query parameters “source” and “currencies” are required fields. So, we need to change the setting by providing a description and set Is required? field to Yes.


Edit Source Parameter:


ShanmugaRaja_1-1675092553553.png


Edit Currencies parameter:


ShanmugaRaja_2-1675092589641.png


5. The Response area displays information based on the HTTP response for the actions. Select Add default response.


ShanmugaRaja_3-1675092647108.png


6. Just input a sample of the response JSON into the body section and click Import.


ShanmugaRaja_4-1675092682058.png


Note: The JSON response can be obtained by copying and pasting our sample URL into the web browser.

7. The Validation section display any issues that are detected in API definition. The validation status will be displayed in the upper-right corner of wizard.


ShanmugaRaja_5-1675092783321.png


Step#4: Code (Preview)

This step is optional. So, I have ignored this step and going to Step 5: Test.


ShanmugaRaja_6-1675092843698.png


Step#5: Test

Before testing our custom connector, we need to Create connector. Click on Create connector button in the top. 


ShanmugaRaja_7-1675092960253.png


Now custom connector is ready to test. Click on the New connection button.


ShanmugaRaja_8-1675093025730.png


To Authenticate the custom connector, a new Tab is opened to enter the API key. This API key is obtained from the APILayer web site. After entering the API key, click the create connection button.


ShanmugaRaja_9-1675093086534.png


Return to the Test tab and click the refresh icon button in the upper-right corner of wizard.


ShanmugaRaja_0-1675093170617.png


Choose the newly create connector in the selected connection field. Then enter a value for the source and currencies fields. Finally, select Test operation button to our custom connector.


ShanmugaRaja_1-1675093239576.png


ShanmugaRaja_1-1675315520377.png


The connector calls the API, and we can review the response, which includes the exchange rate for provided currencies (INR, AUD, EUR).


ShanmugaRaja_2-1675093376545.png


Our custom connector is ready to fly now. In Part2, I will illustrate how to integrate this custom connector with Dynamic 365 CRM using Power Automate. Stay tuned!

ShanmugaRaja
Advocate II
Advocate II

Integrating Dynamic 365 CRM with Third party API via custom connector using Power Automate – Part2


This article is in continuation of Part1 where I tried to give you a comprehensive description of Creating Custom Connectors in Power Automate for third party system API which enables a clearer understanding of custom connectors and its functionality. In Part2, I will give you a brief idea about how to integrate Dynamic 365 CRM with a third-party API via custom connector using Power Automate with a real time business use case.


I will take few moments to explain about multi-currency handling in Dynamic 365 CE.


The base currency is set while setting up the instance or the environment. There can only be one Base currency for instance or environment. Most importantly, the base currency cannot be updated.
But you are selling your products in the global market. It is important to understand that you will have prospects using multi-currencies. Dynamic 365 CE OOB supports you to create multi-currencies seamlessly. The below mentioned screenshot illustrates the default currency record in Dynamic 365 CE which consists of currency code, currency symbol, currency name and exchange rate.


ShanmugaRaja_0-1675316161403.png


To define additional currency, navigate to setting -> Business Management


ShanmugaRaja_1-1675316208233.png


ShanmugaRaja_2-1675316217891.png


We can create additional currencies either system or custom. To create system currency, we can select any of the existing currency codes.


ShanmugaRaja_3-1675316259674.png


For instance, while we create an opportunity record, Dynamic 365 CE automatically sets the default currency for the user.


ShanmugaRaja_4-1675316292064.png


Based on the customer, the Rupee currency is set in opportunity record.


ShanmugaRaja_5-1675316344908.png


While calculating the base amount, Dynamic 365 CE considers the Exchange Rate defined in the currency record.


ShanmugaRaja_6-1675316396245.png


Unfortunately, Dynamic 365 CE does not update Exchange Rates automatically. We should have some mechanism to update the exchange rate on a daily basis.


Let’s Start!!


Our primary goal is to capture live Exchange Rate from third party API and update the currencies records in the Dynamic CE on a daily basis. So, it is better to create a scheduled cloud flow which runs every day.


Step#1: Create a Recurring flow


ShanmugaRaja_7-1675316512559.png


In the next step, we must provide the trigger timing details. Define the starting date and time and repeat frequency. As per our requirement, we want to run it daily so choose to repeat every 1 day at 1:00 PM.


ShanmugaRaja_8-1675316567511.png


Step#2: Initialize Variable
Now we will add an action to initialize the variable to set the base currency code.


ShanmugaRaja_9-1675316616329.png


Step#3: Retrieve Currencies detail from Dynamic 365 CE
Add a new action to retrieve Currencies records from Dynamic 365 CE by using Dataverse connector and action as List rows.


ShanmugaRaja_10-1675316689685.png


Select columns:

Enter a comma-separated list of columns to return. In our case, selected few columns like “transactioncurrencyid,currencyname,isocurrencycode,exchangerate” from currencies table.


Filer Rows:

Filter expression to narrow down the set of rows that Dataverse returns such as “statecode eq 0” for rows with state code is equal Active.

To exclude base currency, the added condition to check “isocurrencycode ne USD” for rows with currency code is not equal to USD.


Step#4: Create Currency Code Array

Add Data Operation - Select action to create a new array from a list that contains currency code. 


ShanmugaRaja_0-1675420943821.png


Note: Although you can add or remove elements by using the select action, you can’t change the number of objects in the array.


Step#5:

Time has come to use our custom connector to get a live exchange rate for a given currency code list. Select Currency Exchange Rate action from choose an operation template.


ShanmugaRaja_1-1675421056665.png


As we know, the currency exchange rate takes two parameters.

1. Source – Base currency is passed.

2. Currencies - Specify a comma-separated list of currency codes. So, I used join expression to join array values with separators of comma delimiter (,).


Expression:

join(body('Select_Currency_Code'), ',' )


ShanmugaRaja_2-1675421388880.png


ShanmugaRaja_3-1675421412692.png


In the background connector calls the API, and you get the response, which includes the live Exchange rate for a given currencies list.


ShanmugaRaja_0-1675429819477.png


My initial thought is to create a cloud flow which runs on a daily basis to capture live Exchange Rate against currencies and update in the Dynamic 365 CE. But my thought processes evolve to add more capabilities to match with real time business process flow. Updating Currencies Exchange Rate is not quite that simple. It will go through several levels of approval process before the exchange rate is reflected in the Dynamic 365 CE. So, I decided to incorporate a PDF file generation and approval processes functionalities.


Step#6:

Using Select - Data Operation action to create a new array which contains currency code, currency name, latest exchange rate and GUID. This array will help us to easily format data, generate a PDF file and update exchange rate values in Dynamic 365 CE.


ShanmugaRaja_0-1675422478799.png


To get currency exchange rate from API response JSON object. I have written an expression to parse the response object using the output function by passing currency code to pick the exact exchange rate value from the API response JSON object.


Expression:

outputs('Currency_Exchange_Rate')?['body/quotes']?[concat('USD',item()?['isocurrencycode'])]


Step#7:

I want to present the data in HTML table format. The first and foremost option is to select Create HTML table - Data Operation action. This action will change a JSON array input into an HTML table seamlessly.


ShanmugaRaja_1-1675422673659.png


Columns are mapped either automatically or header and values are mapped manually. In our case, we have mapped only essential columns to create an HTML table.


ShanmugaRaja_2-1675422745228.png


Step#8:

Create a new step using compose operation action and enter the required CSS style for the table to generate a PDF file.


ShanmugaRaja_4-1675422858719.png


Step#9:

I picked a OneDrive connector to create a file (html file) and convert file (PDF file) seamlessly. As a first step we will use Create file action to create an HTML file in OneDrive.


ShanmugaRaja_5-1675422937680.png


Step#10:

Add convert file action to convert a HTML file into PDF file format using the path.


ShanmugaRaja_6-1675423009915.png


supported file conversion formats are html, htm, docx, msg, ppt, pptx, xls, xlsm, xlsx etc.

while using convert file action, we should be aware of known limitations and file size constraints in place for the protection of the connector's service. note that attempting to perform operations beyond the limits will result in rejection, errors or timeouts. Few key important limitations are listed below.

  • The maximum archive size for Extract archive to folder action is 50 MB and 100 files inside.
  • Then when a file is created or when a file is modified triggers will skip every file bigger than 50 MB.
  • Some errors, like "Access Denied" usually indicate that the file is locked (e.g., by Excel services). Also, the user, file folder, or tenant may have a policy preventing access.

Step#11:

A PDF file created successfully. Now time to attach the PDF file and send it for approval. 

Create a step using "Start and wait for an approval" action and select "Approve/Reject-First to respond" for approval type.


ShanmugaRaja_0-1675446088620.png


Approval type: when a flow with Create an Approval action is configured with Approve/Reject - First to respond, it waits until it's assigned to approve or assigned to reject the approval request.


Step#12:

To evaluate the user response is equal to Approve! then we need to add a "condition" action to handle the response from the previous approval action.


ShanmugaRaja_8-1675423979601.png


on the condition card, select an empty area in box on the left. The dynamic content list opens. Select the Outcome parameter to add it to the box. In the box in the middle of the condition card, select is equal to. In the box on the right, enter the "Approve" text which is mentioned in the approval type.


Step#13:

If yes block:

If Outcome is equal to "Approve" then add Apply to each action to loop through each item from live currency exchange rate list and update Dynamic 365 CRM currencies records with latest Exchange rate.


ShanmugaRaja_9-1675424256901.png


Step#14:

Finally, I decided to store the exchange rate PDF files in SharePoint for future reference.

Using SharePoint connector, add create file action to enter file name and output of converted PDF file content body is passed to file content for the create file action. Select correct SharePoint site address and folder path where we want to store the file.


ShanmugaRaja_1-1675446154981.png


All set! Let's see the cloud flow in action.
The Old Exchange Rate cited below


ShanmugaRaja_11-1675424615292.png


Live Exchange Rate is created as a HTML file in OneDrive


ShanmugaRaja_0-1675449415769.png


HTML file is successfully converted to PDF and attached in approval email.


ShanmugaRaja_5-1675446924974.png


When approver approves the Exchange rate then Cloud flow will update the latest Exchange Rate in Dynamic 365 CRM. The Below screenshot is the updated Exchange rate.


ShanmugaRaja_14-1675424898529.png


Finally, Cloud flow will store the approved versions of the Exchange Rate PDF file into SharePoint for future reference.


ShanmugaRaja_4-1675446487375.png


`Perhaps this article will also give you some inspiration on other ways to make use of Power Automate.


Happy Learning and Happy Sharing. Cheers!!


stpuceli
Employee
Employee

Securing sensitive information in documents is becoming a hard requirement in many organizations.  With the enactment of privacy laws, the ability to redact information at scale is a challenge.  I’ll show you how this can be done using the Power Platform and a simple Azure function.

Read more...

ArchitectMadhan
Memorable Member
Memorable Member

Now, you can make the Chat Bot more effective in handling queries from Customer by using Power Automate Flow.

Read more...

codevenkat
Post Prodigy
Post Prodigy

In Power Automate one of the common scenarios was to extract Look up Field Text which will be a nightmare for the people who are new to Power Automate about how to extract details of lookup field. As an example, on update of Contact Table, Account Details will be extracted.

Read more...

codevenkat
Post Prodigy
Post Prodigy

In Power Automate, during certain scenarios we must traverse all the records in excel file table and based on few conditions content in excel to be updated. List Rows action present under Excel Online(Business) Connector in power automate can be used. As an example scenario of updating eligibility of Employees based on Age explained here.

Read more...

codevenkat
Post Prodigy
Post Prodigy

In Power Automate, at times we must join few items which received in the form of strings. As a scenario, response of the user was taken to show this function behavior.

Read more...

Helpful resources

About the Author
  • Experienced Consultant with a demonstrated history of working in the information technology and services industry. Skilled in Office 365, Azure, SharePoint Online, PowerShell, Nintex, K2, SharePoint Designer workflow automation, PowerApps, Microsoft Flow, PowerShell, Active Directory, Operating Systems, Networking, and JavaScript. Strong consulting professional with a Bachelor of Engineering (B.E.) focused in Information Technology from Mumbai University.
  • I am a Microsoft Business Applications MVP and a Senior Manager at EY. I am a technology enthusiast and problem solver. I work/speak/blog/Vlog on Microsoft technology, including Office 365, Power Apps, Power Automate, SharePoint, and Teams Etc. I am helping global clients on Power Platform adoption and empowering them with Power Platform possibilities, capabilities, and easiness. I am a leader of the Houston Power Platform User Group and Power Automate community superuser. I love traveling , exploring new places, and meeting people from different cultures.
  • Read more about me and my achievements at: https://ganeshsanapblogs.wordpress.com/about MCT | SharePoint, Microsoft 365 and Power Platform Consultant | Contributor on SharePoint StackExchange, MSFT Techcommunity
  • Encodian Owner / Founder - Ex Microsoft Consulting Services - Architect / Developer - 20 years in SharePoint - PowerPlatform Fan
  • Founder of SKILLFUL SARDINE, a company focused on productivity and the Power Platform. You can find me on LinkedIn: https://linkedin.com/in/manueltgomes and twitter http://twitter.com/manueltgomes. I also write at https://www.manueltgomes.com, so if you want some Power Automate, SharePoint or Power Apps content I'm your guy 🙂
  • I am the Owner/Principal Architect at Don't Pa..Panic Consulting. I've been working in the information technology industry for over 30 years, and have played key roles in several enterprise SharePoint architectural design review, Intranet deployment, application development, and migration projects. I've been a Microsoft Most Valuable Professional (MVP) 15 consecutive years and am also a Microsoft Certified SharePoint Masters (MCSM) since 2013.
  • Big fan of Power Platform technologies and implemented many solutions.
  • Passionate #Programmer #SharePoint #SPFx #M365 #Power Platform| Microsoft MVP | SharePoint StackOverflow, Github, PnP contributor
  • Web site – https://kamdaryash.wordpress.com Youtube channel - https://www.youtube.com/channel/UCM149rFkLNgerSvgDVeYTZQ/
Join Blog
Interested in blogging for the community? Let us know.