Hello Readers
This blog is to help fellow consultants to start their journey on PowerApps. We all know how easy it is to put together a screen on Canvas Apps but as and when we need a specific action on it or from it; we fall short of formulas/functions. That’s because we never required these formulas in Model Driven Apps.
But as Business/Functional Consultant, you want to deliver value to your client, make their life easier, Don’t you?
I am sure you do, so here I am providing you with 20 essential functions you must know as a functional consultant. This can be a starting point for you; well, Microsoft is trying hard for Business Users and Functional Consultants to get in the rink of Power Platform. Their learning path is specially designed for Business Users and Functional Consultants, check it out here Learn PowerApps.
All formulas below are simple and easy to understand. You’ll need it in everyday consulting; maybe for pre-sales, maybe for proof of concepts or maybe for a real world app.
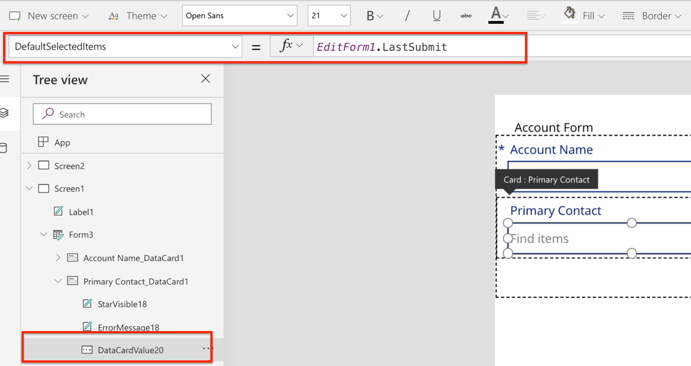
1.Default a lookup in next screen based on the record created in previous screen
e.g create a contact first (in screen 1) then set primary contact when creating account (in screen 2)
Set Lookup fields datacardvalue’s ‘defaultselecteditem’ = Edit/New/FormN.LastSubmit
**N=Your form sequence
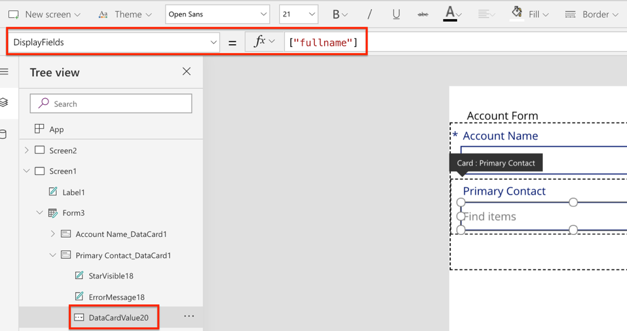
2.Set a lookup with required display field
Set Lookup fields datacardvalue’s ‘DisplayFields’ = [“Fieldname”]
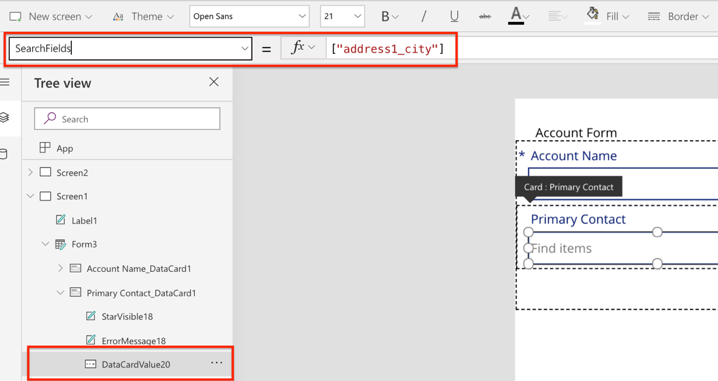
3.Set a lookup with required search field
Set Lookup fields datacardvalue’s ‘SearchFields’ = [“Fieldname”]
4.Set a lookup with multiple search fields
Set Lookup fields datacardvalue’s ‘SearchFields’ = [“Fieldname1”, “Fieldname2”]

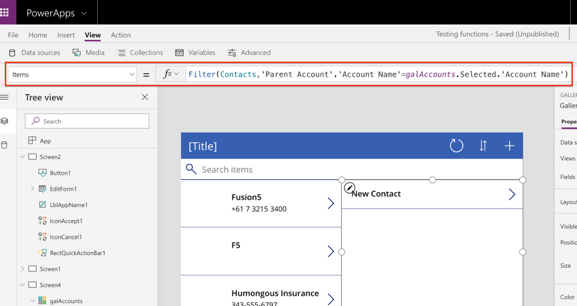
5.Nested grid
Filter(ChildEntityName,’LookupFieldName’. ‘PrimaryFieldName’ =ParentEntityGallery.Selected.’PrimaryFieldName’)
See account and contact example below; it shows related contacts of a selected account
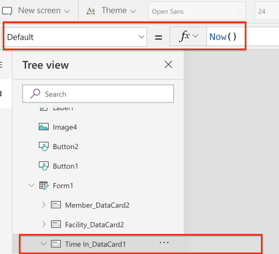
6.Set Date/Date & Time to the current date/time
Set Data card ‘default’ = Now()
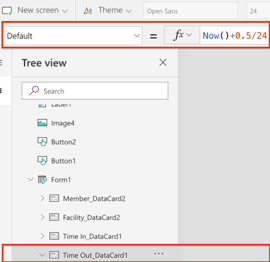
7.Set Date/Date & Time to current plus:
+30 minutes
Set Data card ‘default’ = Now()+0.5/24
+1 hour
Set Data card ‘default’ = Now()+1/24
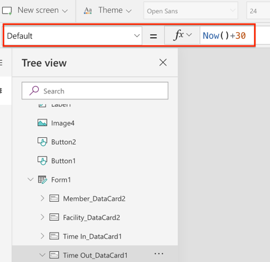
+1 Day
Set Data card ‘default’ = Now()+1
+30 Days
Set Data card ‘default’ = Now()+30
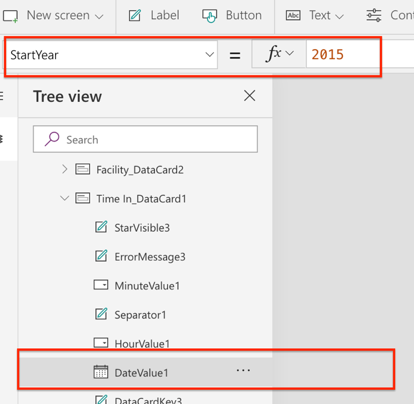
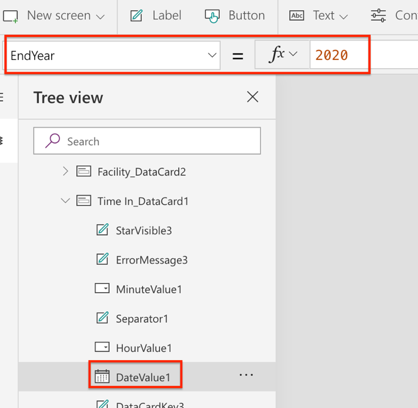
8.Change No. of years that can be selected in date picker
Set the Start year and End year in the Date picker (Start and End date)
Set Date Value ‘Start Year’ or ‘End Year’ = Required Year
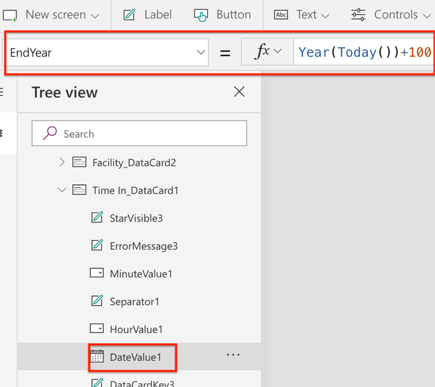
9.Add Years to an End Date, date picker
Set date value Start or End Year = Year(Today())+N
**N=No. of Years
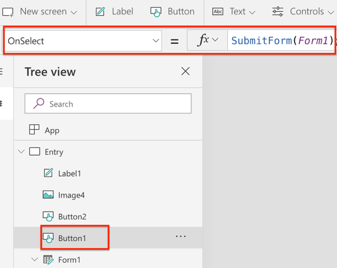
10.Save a form (on button click) to create a record
Set button OnSelect = SubmitForm.FormN
**N= Sequence of form in your app
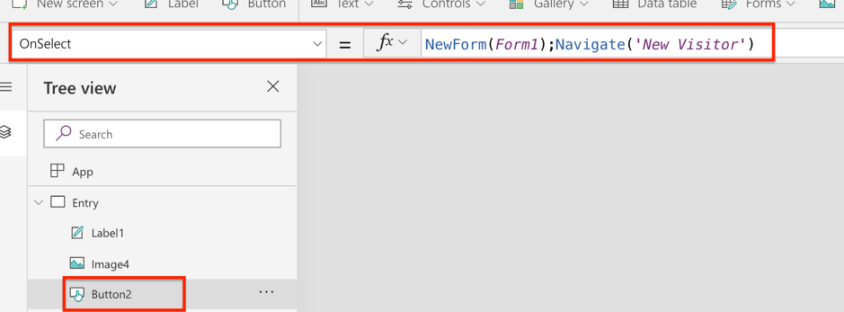
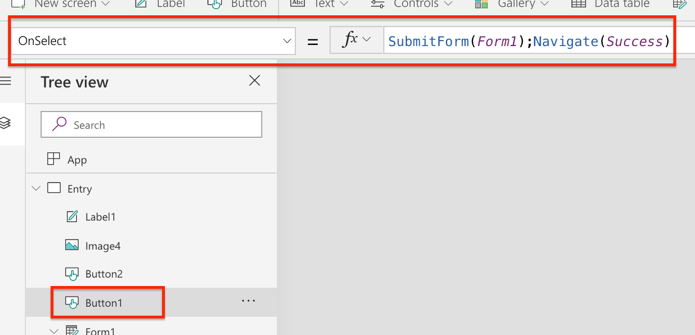
11.Save a form to create a record and navigate to a different screen
Set button OnSelect = SubmitForm.FormN;Navigate(ScreenN)
**N=Sequence of form/screen in your app
12.Save a form to create a record and show success message
Set button OnSelect = SubmitForm.FormN;Navigate(ScreenN)
**ScreenN=Your Success Screen
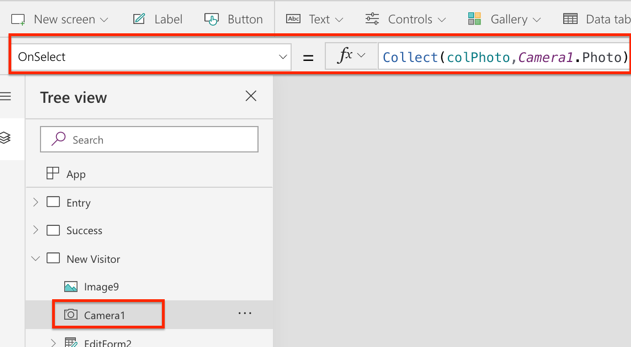
13.Set Camera to store photos in your PowerApps collection
Set Camera Onselect= Collect(colPhoto,CameraN.Photo)
**CameraN=Your Camera Sequence
14.Set entity image to last photo taken by camera
Set EntityImageDataCard’s Image’s Image = If(IsBlank(CameraN.Photo), Parent.Default, CameraN.Photo)
**CameraN=Your Camera Sequence
Meaning of this function- if cameraN does not have any picture in it (as in you haven’t clicked anything yet) then entity image would take its default value. But if you have clicked a picture; entity image will pick that image.

15.Select a record from a grid
Set Icon’s ‘OnSelect’ = Select(Parent)
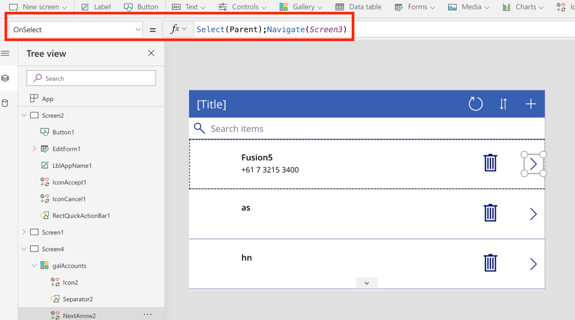
16.Open a record from a grid
Set Icon’s ‘OnSelect’ = Select(Parent);Navigate(ScreenN)
ScreenN=View/edit screen
17.Delete a record on a grid
Set Icon’s ‘OnSelect’ =RemoveIf(datasource, primaryfield = GalleryN.Selected.primaryfield)

18.Setting up a logo on screen
Insert Tab>> Add Image>>Upload>> Resize from properties
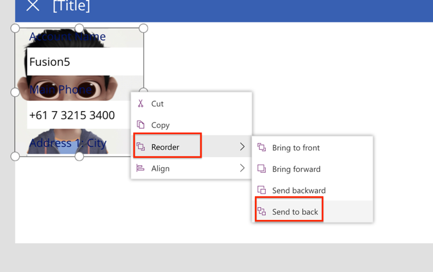
19.Setting up a background image
Insert Tab>> Add Image>>Upload>> Resize>>Send to back
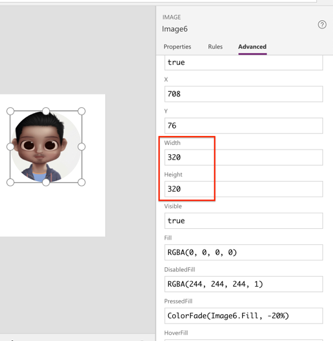
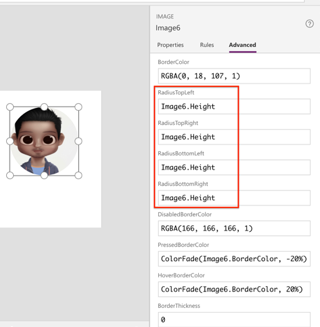
20.Rounding an Image
Click on image and set height and width equal
Now set, RadiusTopLeft =RadiusTopRight=RadiusBottomLeft=RadiusBottomRight=ImageN.Height
**Under Advanced on the right of your screen
Those are enough formulas to get you started.
Hope you find this helpful!
Subscribe to my YouTube
Enjoy PowerApps !!
 ManishM
on:
How do you bulk download attachment files from a D...
ManishM
on:
How do you bulk download attachment files from a D...
 on:
What you should know when recruiting for a Power P...
on:
What you should know when recruiting for a Power P...
 on:
Introduction of AI Builder in Power Automate: How ...
on:
Introduction of AI Builder in Power Automate: How ...
 on:
Top-down 2D game engine proof of concept
on:
Top-down 2D game engine proof of concept
 WarrenBelz
on:
Locking down SharePoint so only Integrated App can...
WarrenBelz
on:
Locking down SharePoint so only Integrated App can...