- Power Apps Community
- Welcome to the Community!
- News & Announcements
- Get Help with Power Apps
- Building Power Apps
- Microsoft Dataverse
- AI Builder
- Power Apps Governance and Administering
- Power Apps Pro Dev & ISV
- Connector Development
- Power Query
- GCC, GCCH, DoD - Federal App Makers (FAM)
- Power Platform Integration - Better Together!
- Power Platform Integrations (Read Only)
- Power Platform and Dynamics 365 Integrations (Read Only)
- Community Blog
- Power Apps Community Blog
- Galleries
- Community Connections & How-To Videos
- Copilot Cookbook
- Community App Samples
- Webinars and Video Gallery
- Canvas Apps Components Samples
- Kid Zone
- Emergency Response Gallery
- Events
- 2021 MSBizAppsSummit Gallery
- 2020 MSBizAppsSummit Gallery
- 2019 MSBizAppsSummit Gallery
- Community Engagement
- Community Calls Conversations
- Hack Together: Power Platform AI Global Hack
- Experimental
- Error Handling
- Power Apps Experimental Features
- Community Support
- Community Accounts & Registration
- Using the Community
- Community Feedback
- Power Apps Community
- Power Apps Community Knowledge Base
- Community Support Knowledge Base
- Using the Community
- User Group Leader Get Started Guide
- Article History
- Subscribe to RSS Feed
- Mark as New
- Mark as Read
- Bookmark
- Subscribe
- Printer Friendly Page
- Report Inappropriate Content
- Mark as New
- Bookmark
- Subscribe
- Mute
- Subscribe to RSS Feed
- Permalink
- Report Inappropriate Content
User Group Leader Get Started Guide
User Group Leaders – Welcome to your Get Started Guide.
This article will give an overview of the user group experience for user group leaders in the following communities:
For user group leaders whose focus spans more than one of the above communities, visit Power Platform User Groups Power Platform User Groups.
Your user group experience in our communities should be very similar across the board. For the purpose of this article, all images will be from Power BI User Groups.
*Please note that any locations or user groups visible in the images below are representations of functionality.
Create a new user group
If you do not see a user group in your city or one that meets your interests, please feel free to create a group.
There are two ways to create a user group within the community.
One way is by selecting the “See all” button from the user group "Discover" page.

Then, select the “Start a new group” button.

The second way is to select the "Your groups" tab and then click “Start a new group.”

After selecting, “Start a new group”, a popup will appear that provides you with a brief overview of the necessary steps to create a group.
Click “Get started” on the popup.

From here, you will be taken to the “Start a new group” page. Please fill in the required fields that are marked with red asterisks.

The location rendered is automatic. If you decide to change your location, you MUST use a auto-suggested location to select a city, state/province, and country so that search by location renders your user group.
There is a limitation of 10 user group leaders.
If you do not upload a cover photo, a Microsoft approved photo will appear on your user group homepage.
When all the fields are populated, select the yellow “Preview” button to preview your user group. You will be shown a preview of what your user group will look like. From here you can either go back to edit & make changes, or submit for approval.

Once you 'Submit for approval', your user group will now appear in a Pending state under the “Your groups” tab until a User Group Coordinator approves your request. This will take up to 48 hours.
Note: Sometimes our User Group Coordinators require additional information from you when creating user groups. A User Group Coordinator may contact you via email or through a private message in the community with questions.
Once your group is approved, you will see a private message in the community stating that your group is now live.
You can access your newly created user group via the “Your groups” tab on the user group homepage or by clicking the link in the private message.
How to Edit an existing user group
To edit your user group, click on “Manage group” on your user group homepage.
From here, drop down to select “Edit group.”

You can edit any area that is not grayed out on this form.
Note: To add an additional user group leader or request additional support with your group, please visit the support form linked at the top of the edit page.
Bulk message user group members
From any tab of your user group (Group info, Discussion, Members, Events, Resources), you can bulk private message all the members of your user group by clicking on the 'Manage group' drop-down and selecting 'Message members'. This will send a private message in the community to all the user group members:

Note that community members control their own private message settings and some users may opt to turn off their private messages.
Step down as a user group leader
From your user group homepage, click on the yellow “You're a user group leader” button.
Then select “I want to step down.”

Note: If you are NOT the only user group leader, you can choose to stay as a member of the group by selecting the checkbox.

If you are the only user group leader and you wish to step down you MUST identify a replacement and fill out our community support form here: https://aka.ms/PPCommSupport or on the edit group page. When you complete the support form, you can choose to either remain a member of the group, or be removed.

Publish and share a resource link
User group leaders can publish and share important resources with their group members and/or event attendees.
While either on your user group user group event homepage, click on the “Resources tab.”
Click the plus button titled “Add a resource.”

Note: Resources can only be active URLs.
After you add your resource, hit the yellow “Save” button.

Your resource is now live for your members to see.
If you would like to share your resource outside of the community, please click on the blue arrow button or the 3 ellipses and select “Share.”

You will then be given a link to your resource and the option to share via the various social media platforms listed.
Remove/edit a resource
For user groups and user group events, to edit a resource, click on the 3 ellipses and select “Edit.”
To remove a resource, click on the 3 ellipses and select “Delete.”

Share your user group
From your user group homepage click “Share group” to spread the word about your newly created user group.
You have the option to share a direct link on an external site or you can share your group details by clicking on the social icons listed.

How to create an event
Note: Events can only be created by user group leaders.
Go to your user group homepage and click "Manage group." Drop down to select "Create an event."

Fill out the form with your event details.
Note: There are several required fields that must be filled out to create your event. These fields are marked with red asterisks.
There are some tags not allowed in the event description field. When listed orders, unlisted orders, center, pre tags, horizontal tags, and strike words in the description field, an error message appears below the event description (see screenshot below). These tags are not allowed in the event description field:


The above error may also occur if the user copies text from some other location (ex: external websites, etc) and pastes it into the event description field, as the above tags maybe present in the copied text.
In-person events: If hosting an In-person event, you MUST use an auto-suggested location. The city/state/country will populate as you type your location address. Simply click on the suggested address when it appears.

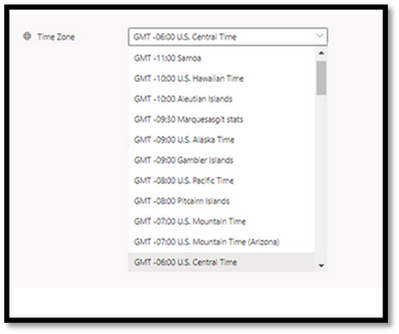
Time zone: You can choose the time zone when creating or editing an event by using the 'Time Zone' drop-down.
Additional speakers: To add more speakers to your event, please click on the plus sign.

The maximum number of speakers per event is limited to 5. If you have identified more than 5 speakers for an event, the additional speakers may only be added to the description portion of the request and not in the designated speaker text boxes.
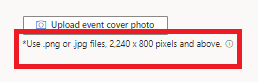
Cover photo: If you would like to submit a cover photo for your upcoming event, please note that the image size needs to be 2240x800 pixels. Use .png or .jpg files only.
If you choose not to provide your own event image, a Microsoft approved photo will automatically show when you Preview or Publish your event.
Preview your event: After you input all your event details, click on the yellow "Preview" button located on the bottom right-hand corner of the screen.
If changes are necessary, you can click 'Back to edit'. If everything looks good, you can select 'Publish'.
You MUST click the yellow "Publish" button located in the top right corner of your screen in order for your event to be published.

After you press "Publish", your event is now live on your user group event page.
Edit an existing event
From your event page, click "manage event", and drop down to select "Edit event". You will be able to edit any detail of your existing event.

Once you make changes, click "Preview" to simply view your event OR click "Publish" to have your event go live immediately.
Note: If you click "Preview," you MUST click "Publish" from the Preview page (see step 7 in "How to Create an Event" above).

How to delete an existing event
From your event homepage, click on "Manage event" and drop down to select "Delete event."

After you click delete, a pop up will appear that allows you to inform registered attendees that your event has been canceled/deleted. To add a personal note to attendees, please check "Add a personal note."
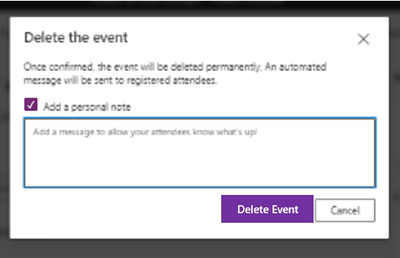
After you are done with your personal note, please click the yellow "Delete event" button. The following message will then appear:

Your event has been successfully deleted.
Bulk message event attendees
From your event homepage, click on "Manage event" and drop down to select "message attendees"

From here, you will be redirected to a private message field. This is where you will draft a message to your event attendees.

Press the yellow "Send" button in the right-hand corner of your screen.
Note: Once a message is sent, it cannot be undone.
Add event to your calendar
Once your event is created, it is time to promote it!
Click the "Add to your calendar" button on your event homepage, select "Download .ocs file" to add the event to your calendar.

Share your event
If you are interested in sharing your event, click "share event" on your event homepage.
You will be given a direct link to your event which you can copy and paste to an email or social media post OR you can directly share your event details on Facebook, LinkedIn, or Twitter by clicking on the icons below.

Tip: If you want your user group members to easily find your new event, try sharing the direct event link to the discussion forum on your user group homepage.
How to get user group support
If you need user group related support, please submit your support request via our community support: aka.ms/PPCommSupport.